Uncovering GenAI - Chapter 5: Building a Retrieval-Augmented Generation Application
Posted on 2025-07-21
From forming our understanding of Retrieval Augmented Generation (RAG) in
the previous post, we now turn to building a RAG application. In this post, we will build a simple RAG
application using:
- Semantic Kernel,
- DotNet 9 Console Application,
- nomic-embed-text as Embedding Model,
- Llama 3.2 (1B) as Chat Model,
- Qdrant Vector Database,
What are we building?
👜 The Product:
The RAG application will augment the chat assistant to answer questions about Star Wars characters
leveraging (Hugging Face Star Wars Characters
Dataset).
🏗️ Building Blocks:
We will be building a straightforward console-based chatbot in
.NET using Semantic
Kernel and Ollama's local LLM capabilities.
Why choose a local LLM?
The main reason for choosing to run a local LLM is that it’s cost-free. Additionally, for the
purposes of the demo application, we can simply point it to a localhost endpoint without over-head
of setting up a account with a cloud provider or managing authentication. The application will run
entirely on your local machine.
Why choose Semantic Kernel?
The Semantic Kernel is a powerful framework that simplifies the process of building GenAI
applications. Other than C#, Semantic Kernel also offers SDK support for Python, and Java. LangChain
is another popular framework, though it offers SDKs Only for Python and TypeScript.
🛺 Process:
- The app first loads the Star Wars characters dataset, which is then used to create embeddings and uploaded to a vector database (Qdrant).
- Next, the app prompts the user for a question which is also converted to an embedding.
- The embedding of the question is then used to query the vector database for relevant data.
- A context based on the user's question, the retrieved data, the chatbot's purpose, and some additional instructions are then created.
- The context is then sent to LLM. The LLM generates a response based on the context which is then displayed to the user.
            sequenceDiagram
                actor User
                participant App as Console
Application
(.NET)
                participant Data Source as Hugging Face
Star Wars
Characters Dataset
                participant Qdrant as Qdrant
Vector
Database
                participant Embed as Ollama
Embedding
Model
                participant LLM as Ollama
Chat
Model

                Note left of App: Phase 1 -
Indexing: Building the index
                App->>Data Source: Fetch Star
Wars Characters
Dataset
                App->>Embed: Convert prompt to
embedding
                Embed-->>App: Returns embedding
                App->>Qdrant: Upload embeddings
to vector database
                Qdrant-->>App: Confirms upload

                Note left of App: Phase 2 -
Retrieval i.e.
Responding to user prompt/input
                loop User Interaction
                    User->>App: Inputs a prompt/question
                    App->>Embed: Convert question to
embedding
                    Embed-->>App: Returns question
embedding
                    App->>Qdrant: Query vector database
for relevant data
                    Qdrant-->>App: Returns relevant data
                    App->>App: Create context
from question, data and
additional instructions
                    App->>LLM: Send context to
LLM for response
                    LLM-->>App: Returns response
                    App->>User: Display response
                end
                loop
                    User->>App: Inputs a prompt/question
                    App->>Embed: Convert question to
embedding
                    Embed-->>App: Returns question
embedding
                    App->>Qdrant: Query vector database
for relevant data
                    Qdrant-->>App: Returns relevant data
                    App->>App: Create context
from question, data and
additional instructions
                    App->>LLM: Send context to
LLM for response
                    LLM-->>App: Returns response
                    App->>User: Display response
                end
Let's get building!
Step 1: Prerequisites
Before we start building our application, we need to set up a few things. Here is a list of
prerequisites that you will need to follow:
- Download and set up Ollama on your machine. The instructions can be found on their website.
-
Once you have Ollama installed, you can run the
ollama servecommand to start the Ollama server. -
Once the server is started, you can pull the model. For this demonstration, we will use the
nomic-embed-textmodel for embeddings andllama3.2:1bfor chat. - To begin, ensure you have the .NET 9 SDK installed on your machine. You can follow the official installation guide.
-
Now, we can create a new console application using the dotnet CLI commands (see commands). This will
create a new solution and a console project named
RagSemanticKernelChatApp. - Next, we will add all the necessary nuget packages to the project.
# Start Ollama server and pull the model
ollama serve &
ollama pull nomic-embed-text
ollama pull llama3.2:1b

# Create a new solution and console project
dotnet new sln -n GenAITutorials
dotnet new console -n RagSemanticKernelChatApp
dotnet sln add RagSemanticKernelChatApp/RagSemanticKernelChatApp.csproj

# Add necessary packages
cd RagSemanticKernelChatApp

# Add packages for setting up the application host and configuration
dotnet add package Microsoft.Extensions.Hosting
dotnet add package Microsoft.Extensions.Configuration

# Add packages for setting up the other application capabilities
dotnet add package Microsoft.Extensions.Http
dotnet add package System.Linq.Async

# Add packages for Semantic Kernel and Ollama connector
dotnet add package Microsoft.SemanticKernel
dotnet add package Microsoft.SemanticKernel.Connectors.Ollama --prerelease
dotnet add package Microsoft.SemanticKernel.Connectors.Qdrant
Step 2: Wiring up the application
With the project skeleton in place, we need to wire up the application. For this, we will have to do a
couple of things:
-
Create a
RagSemanticKernelChatApplicationclass and use the constructor to set up the application host and configurations. The configuration setup will allow reading various settings fromappsettings.jsonin the next step. -
Now we will register a service with dependency injection that lets our application use a local
Ollama embeddings and chat completion model (our downloaded LLM model in the Prerequisites
step). This is done by leveraging the out-of-the-box methods from Semantic Kernel
AddOllamaEmbeddingGenerator,AddQdrantVectorStore, andAddOllamaChatCompletionmethod that the Semantic Kernel packages. -
We will now register the
Kernelclass as a transient service in the dependency injection container. This will allow dependency injection to resolve theKernelclass on demand. - Finally, we will build the host and expose a method to get the service from the host's service provider.
public class RagSemanticKernelChatApplication
{
    private readonly IHost _host;

    public RagSemanticKernelChatApplication()
    {
        var hostBuilder = Host.CreateDefaultBuilder();
        hostBuilder.ConfigureAppConfiguration(cfg => { cfg.AddJsonFile("appsettings.json", false, true); });

        hostBuilder.ConfigureServices((context, services) =>
        {
            services.AddSingleton(context.Configuration);
            RegisterDataSourceService(context.Configuration, services);
            RegisterEmbeddingGenerator(context.Configuration, services);
            RegisterVectorDb(context.Configuration, services);
            RegisterChatProvider(context.Configuration, services);
            RegisterKernel(services);
        });

        _host = hostBuilder.Build();
    }

    private static void RegisterDataSourceService(IConfiguration config, IServiceCollection services)
    {
        var starWarBaseUrl = new Uri(config["DataSource:Endpoint"] ?? string.Empty);
        services.AddHttpClient<IStarWarCharacterService, StarWarCharacterService>(c =>
            c.BaseAddress = starWarBaseUrl);
    }

    private static void RegisterEmbeddingGenerator(IConfiguration config, IServiceCollection services)
    {
        var embeddingEndpoint = new Uri(config["Ollama:Endpoint"] ?? string.Empty);
        var model = config["Ollama:EmbeddingModel"] ?? string.Empty;
        services.AddOllamaEmbeddingGenerator(model, embeddingEndpoint);
    }

    private void RegisterVectorDb(IConfiguration config, IServiceCollection services)
    {
        services.AddQdrantVectorStore(
            config["Qdrant:Endpoint"] ?? "",
            int.Parse(config["Qdrant:Port"] ?? "6334"),
            false
        );
    }

    private void RegisterChatProvider(IConfiguration config, IServiceCollection services)
    {
        var chatEndpoint = new Uri(config["Ollama:Endpoint"] ?? string.Empty);
        var model = config["Ollama:ChatModel"] ?? string.Empty;
        services.AddOllamaChatCompletion(
            model,
            chatEndpoint
        );
    }

    private void RegisterKernel(IServiceCollection services)
    {
        services.AddTransient(serviceProvider => new Kernel(serviceProvider));
    }

    public T GetService<T>() where T : notnull
    {
        return _host.Services.GetRequiredService<T>();
    }
}
Step 3: Building our Star Wars Character Assistant
Now that we have the application host set up, we can build our Star Wars Character Assistant. To doing so,
we use the
CharacterAssistant class, which leverage dependency injection to get the
kernelobject which is used to initialize IChatCompletionService _chatService and
QdrantVectorStore _vectorStore. These are then used by the class methods to perform 2 key
phases of a RAG application:
-
Indexing which is taken care of by the
IngestAsyncmethod. The method takes a list of Star Wars characters and uploads them to the vector database. -
Retrieval which is taken care of by the
ReplyToPromptmethod. The method takes a user prompt, generates an embedding for it, retrieves the top 10 most relevant characters from the vector database, builds a context based on the retrieved characters and the user's prompt, and then calls the LLM to generate a response.
public class CharacterAssistant(Kernel kernel)
{
    private const string CollectionName = "star-wars-characters";
    private const string VectorName = "character-details";

    private readonly IChatCompletionService _chatService = kernel.GetRequiredService<IChatCompletionService>();

    private readonly IEmbeddingGenerator<string, Embedding<float>> _embeddingGenerator =
        kernel.GetRequiredService<IEmbeddingGenerator<string, Embedding<float>>>();

    private readonly QdrantVectorStore _vectorStore = kernel.GetRequiredService<QdrantVectorStore>();

    public async Task IngestAsync(List<StarWarCharacter> characters)
    {
        var collection = await GetCollection(_embeddingGenerator);
        await collection.UpsertAsync(characters);
    }

    public async Task<string> ReplyToPrompt(string prompt)
    {
        // 1. Generate embedding for the prompt
        var promptEmbedding = await _embeddingGenerator.GenerateAsync(prompt);

        // 2. Retrieve the top 5 most relevant characters
        var collection = await GetCollection(_embeddingGenerator);
        var topCharacters = collection.SearchAsync(promptEmbedding, 10);


        // 3. Build the full LLM prompt including which weeks to reference
        var context = string.Join(
            "\n",
            await topCharacters.SelectAwait(c => ValueTask.FromResult($"- {c.Record}")).ToArrayAsync()
        );
        var fullPrompt = $"""
                          You are an expert in Star Wars characters.

                          A user has asked the following question:
                          {prompt}

                          You have access to information about the following 10 Star Wars characters:
                          {context}

                          Please generate a response that:
                          * Uses only the information provided in the context.
                          * Understand the question from user and answer it based on the context.
                          * Does not include or mention any characters not included in the context.
                          * Does not make inferences, assumptions, or include knowledge beyond the provided context.
                          * Limits references to a maximum of 5 characters from the provided context, based on relevance.
                          * Stay factual, context-bound, and concise.
                          """;


        // 5. Call the LLM
        var chatMessageContent = await _chatService.GetChatMessageContentAsync(fullPrompt);
        return chatMessageContent.Content ?? string.Empty;
    }

    private async Task<QdrantCollection<ulong, StarWarCharacter>> GetCollection(
        IEmbeddingGenerator<string, Embedding<float>> embeddingGenerator)
    {
        var collectionOptions = new QdrantCollectionOptions
        {
            EmbeddingGenerator = embeddingGenerator,
            HasNamedVectors = true,
            Definition = StarWarCharacter.GetVectorStoreCollectionDefinition(VectorName)
        };

        var qdrantClient = _vectorStore.GetService(typeof(QdrantClient)) as QdrantClient;
        var collection = new QdrantCollection<ulong, StarWarCharacter>(
            qdrantClient!, CollectionName, true, collectionOptions);
        await collection.EnsureCollectionExistsAsync();
        return collection;
    }
}
Step 4: Putting it all together
Our orchestration sits in the
Program.cs file. Let’s walk through the code step by step:
-
Line number 6 wires up the application by setting up host, configuration, and dependency
injection. This is done by creating an instance of the
RagSemanticKernelChatApplication(SeeStep 2). -
Line number 8-14 take care of getting data set and triggering the indexing phase by calling
IngestAsyncmethod on theCharacterAssistant(See Step 3). -
Lines 16-32 handle user interactions with chat assistant within a loop. The user enters a
prompt, which is then passed to the
ReplyToPromptmethod of theCharacterAssistant. (See Step 3).
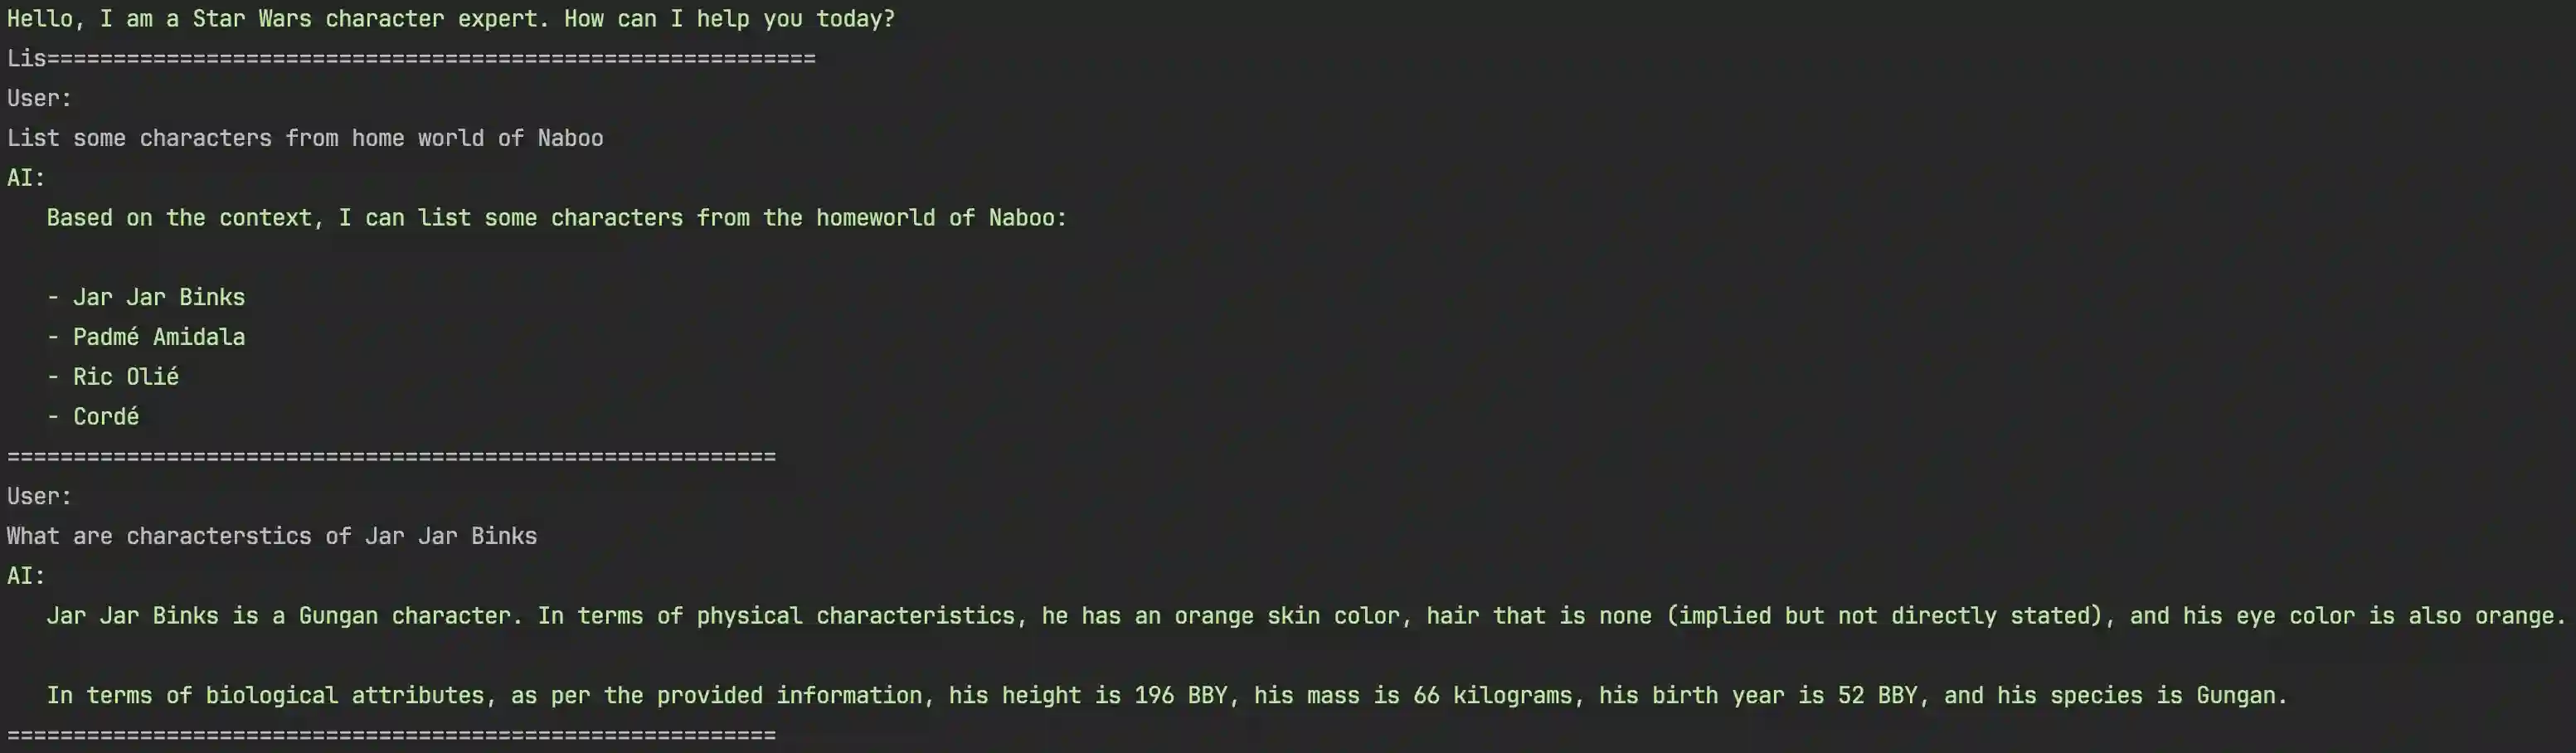
Its time to run the application and see it in action! You can run the application from your preferred
IDE or simply or via the command line using the
dotnet run.
Console.ForegroundColor = ConsoleColor.Green;
Console.WriteLine("Hello, I am a Star Wars character expert. How can I help you today?");
Console.ResetColor();

var app = new RagSemanticKernelChatApplication();

var characterService = app.GetService<IStarWarCharacterService>();
var characters = await characterService.GetCharactersAsync();


var kernel = app.GetService<Kernel>();
var assistant = new CharacterAssistant(kernel);
await assistant.IngestAsync(characters);

do
{
    Console.WriteLine("==========================================================");
    Console.WriteLine("User: ");
    var userInput = Console.ReadLine();
    if (string.IsNullOrWhiteSpace(userInput) || userInput.Equals("exit", StringComparison.OrdinalIgnoreCase))
    {
        Console.WriteLine("Exiting chat...");
        break;
    }

    var reply = await assistant.ReplyToPrompt(userInput);
    Console.ForegroundColor = ConsoleColor.Green;
    Console.WriteLine("AI:");
    foreach (var line in reply.Split("\n")) Console.WriteLine($"   {line}");
    Console.ResetColor();
} while (true);
Resources
The complete source code for this blog post is available on GitHub. You are welcome to clone the
repository and explore the implementation at your own pace. If you are interested in building a
Retrieval-Augmented Generation (RAG) application without using Semantic Kernel, there is an additional example available (also written
in .NET) that demonstrates an alternative approach. Feel free to explore both repositories to compare and learn
from the different patterns.
Next Up
Coming soon...
Stay tuned for the next topic in the series. I will update this section once the next blog post is published.